Unfortunately Ember’s version of handlebars does not support the {{@index}} value in a loop. If you do a google search you’ll find many people asking how to get this, without much help. The most frequent solution is to use the itemViewClass, which creates a nested view object for each iteration, which means you have to use view.parentView to access that templates view. What about a solution that just works out of the box?
Category Archives: Code
CSS Only Placeholders Field Labels (i.e. Float Labels)
In a previous post I showed how I made the float labels for Nest’s store, which can make forms with placeholder labels more user friendly.
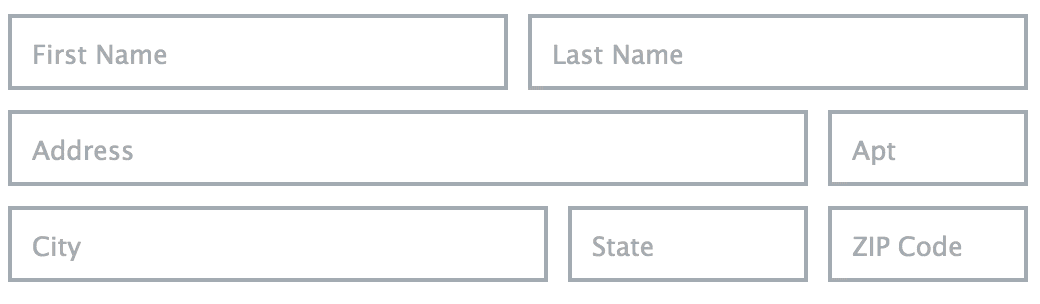
One of the glaring problems with the solution was that it required JS to work. Shortly after posting I realized that there was a very simple way to make this work without JavaScript for browsers that support the adjacent sibling selector. All you need to do is put the label after the field and then add a couple lines of CSS. In short
HTML
<span class="field">
   <input type="text" id="fname" name="fname" placeholder="First Name" />
   <label for="fname">First Name</label>
</span>
CSS
.field label {
  display: none;
}
.field input:focus ~ label {
  display: block;
}
This assumes that you have styles already defined for how you want to present the label. See the demo for the full code.
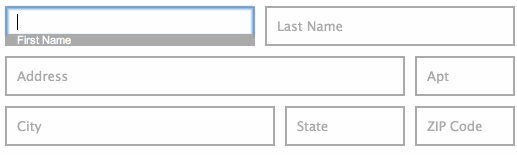
Persisting Labels
If you want to make the float labels persist after the user leaves the field, you can use the CSS3 :valid pseudo class along with the required attribute. When you put a required attribute on a field, the browser will mark it as ‘valid’ if it is not empty. This way we can show the float label when the user has entered something in the field.
HTML
<span class="field">
   <input type="text" id="fname" name="fname" placeholder="First Name" required />
   <label for="fname">First Name</label>
</span>
CSS
.field label {
  display: none;
}
.field input:focus ~ label,
.field input:valid ~ label {
  display: block;
}
Full Demos
To see both of these in action:
- Demo 1: Non persisting labels
- Demo 2: Persisting labels
Loading JSON with embedded records into Ember Data 1.0.0 beta
This is a follow-up to my last post that showed how to export an ember data object with embedded relationships into one nested JSON structure. This time we’ll take the same JSON and load it back into ember.
Here’s the JSON object we’ll be importing:
{"child": {
    "name": "Herbert",
    "toys": [{
        "kind": "Robot",
        "size": {
          "height": 5,
          "width": 5,
          "depth": 10
        },
        "features": [{
            "name": "Beeps"
          },{
            "name": "Remote Control"
        }]
    }]
  }
}
This should create a child record, with one toy that has size and a couple features. The model definition looks like this:
App.Child = DS.Model.extend({
    name: DS.attr('string'),
    toys: DS.hasMany('toy', {embedded: 'always'}),
});
Ember.Inflector.inflector.irregular("child", "children");
App.Toy = DS.Model.extend({
    kind: DS.attr('string'),
    size: DS.belongsTo('size', {embedded: 'always'}),
    features: DS.hasMany('feature', {embedded: 'always'})
});
App.Size = DS.Model.extend({
    height: DS.attr('number'),
    width: DS.attr('number'),
    depth: DS.attr('number')
});
App.Feature = DS.Model.extend({
    name: DS.attr('string')
});
Continue reading Loading JSON with embedded records into Ember Data 1.0.0 beta
Serializing Embedded Relationships with Ember Data 1.0.0 beta
In the latest Ember Data (currently 1.0.0-beta.4) saving or serializing embedded records doesn’t work the way some of us wish. By default it will serialize the parent record and include a list of IDs for the nested records. This is good practice and fine for data that will be stored in a SQL database, however, my project needs to export the entire structure into a single JSON that will be saved to a file. Even though you cannot do this out of the box, adding just a few lines of code will get it working!
Continue reading Serializing Embedded Relationships with Ember Data 1.0.0 beta
Good UX for Placeholders as Field Labels (i.e. Float Labels)
Checkout my follow-up CSS only solution
UPDATE: My floating labels were featured on CSS Tricks!
I know that it is well understood that using placeholder labels are bad practice. However, they continue to be used because they make forms appear tight, and responsive for mobile devices. Unfortunately, in practice they don’t provide a very good user experience.
Continue reading Good UX for Placeholders as Field Labels (i.e. Float Labels)
Running IE on your Mac, for free via modern.ie
Several years ago I figured out how to convert the Virtual PC images windows used to provide for Windows testing to VirtualBox format, that would run on the Mac. It was a long process but was the only way to legally(ish) test Windows for free on your Mac.
This year Microsoft lauched modern.ie, where they providing Windows on free disk images compatible on Mac and Linux!
Continue reading Running IE on your Mac, for free via modern.ie
Ruby on Rails: Hash#Except and Converting Arrays to Args
Tonight I was working on rewriting the event creation flow for MixerMixer, the social event community I’ve been building, and couldn’t figure out why the Hash#except method wasn’t working.
Continue reading Ruby on Rails: Hash#Except and Converting Arrays to Args
Semantic Tab Box v2.0
Heads up! This was written in 2007 and many things have changed since then. This is probably not the most modern approach.
Last year I came up with the original semantic tab box, now I’m improving it. Here are the things I wanted to fix:
- Keep JavaScript unobtrusive — no inline event handlers and needs to work without JavaScript.
- Create a standard API that can be easily reused and customized.
- Make the markup more flexible.
- Support both vertical and horizontal tabs.
- Don’t constrain the height of the box — let it expand to the size of the content.
- Keyboard navigation.
How is this better that other tab boxes out there?
All the tab boxes I’ve seen overcomplicate their solutions. They start with an unordered list of the tab names, followed by the content blocks. With a bit of CSS this looks very nice, but for screen readers the content is disconnected from the tab names and can be very confusing. Just try turning off CSS, you’ll see how horrible this looks:
The Internet is a worldwide, publicly accessible network of interconnected computer networks that transmit data by packet switching using the standard Internet Protocol (IP).
Accessibility is a general term used to describe the degree to which a system is usable by as many people as possible.
Progressive enhancement is a label for a particular strategy of Web design that emphasizes accessibility, semantic markup, and external stylesheet and scripting technologies…
Notice how the content is disconnected from the “tabs” when CSS is disabled (or when being read by a screen reader).
To solve this problem, most people just duplicate the tab name with a header (h2, h3, etc) at the top of each content block and use CSS to hide them from visual users. Here’s an example of what this solution looks like without CSS:
Internet
The Internet is a worldwide, publicly accessible network of interconnected computer networks that transmit data by packet switching using the standard Internet Protocol (IP).
Accessibility
Accessibility is a general term used to describe the degree to which a system is usable by as many people as possible.
Progressive Enhancement
Progressive enhancement is a label for a particular strategy of Web design that emphasizes accessibility, semantic markup, and external stylesheet and scripting technologies…
Sure this works, but why the redundancy? Yuck!
My solution gets rid of the unordered lists and formats the content blocks logically — with header tags.
Enough talk…
…lets get to the examples:
- Simple-Horizontal: A simple horizontally oriented tab box.
- Simple-Vertical: A simple vertically oriented tab box.
In <head>
<script type="text/javascript">
   var tabs = new Tabbox("editorTabs")
</script>
In <body>
<div id="myTabbox">

   <!-- Internet Tab -->
   <div class="tabPanel selected">
      <h3><a href="#interWebTab">Internet</a></h3>
      <div id="interWebTab" class="tabContent">
         <p>
            The Internet is a worldwide...
         </p>
      </div>
   </div>

   <!-- Accessibility Tab -->
   <div class="tabPanel">
      <h3><a href="#accessTab">Accessibility</a></h3>
      <div id="accessTab" class="tabContent">
         <p>
            Accessibility is a general term used to...
         </p>
      </div>
   </div>

</div>
Pretty simple huh?
Accessibility and Non-JavaScript Support
This new version supports accessibility by using CSS to hide the content divs (<div class="tabContent">) off screen, instead of with the unaccessible display:none CSS property.
These CSS classes are applied with JavaScript, so the content will be viewable if JavaScript is disabled or broken on the page. Try viewing the examples with JavaScript disabled and you’ll see what I mean.
API
To setup the tab box all you need to do is initialize the Tabbox object with the main div ID:
var box = new Tabbox("myTabbox", { header: "h3",
                                   vertical : true,
                                   select: 1,
                                   autosize: true });
All the values in the second parameter are optional:
| Name | Default | Description |
|---|---|---|
| header | “h3” | The header element used for each tab name. This element cannot be used anywhere else in the content block. |
| vertical | false | If the tabs should be oriented vertically. The tabs are setup horizontally by default. |
| select | 0 | The tab index to select initially. |
| autosize | true | Automatically size the box to the content of the tab. |
The code has been commented and layed out logically so updating it with features and enhancements should be easy. Speaking of enhancements…
Advanced Example — Hey Look! Something shiny.
So far the examples have been rather simple and plain so I wanted to create one that was more advanced. This example has a more complex UI, animations and implements the YUI history manager. Now when you change tabs it adds history to your browser and the back button will select the previous tab. Check it out — it’s the Über-Cool, Shiny, Tab Box.
Download
Now that you’ve seen the examples, you can download all the code and use it on your site:
tabbox2.zip (46K)
ClassAnim & HoverHijax: Keeping Presentation out of Your JavaScript
Heads up! This was written in 2007 and many things have changed since then. Nowadays, CSS transitions are widely supported by browsers and a better approach.
Ever since the dawn of CSS and compliant browsers web developers have been squeezing the presentation layer out of HTML and into external CSS files. It has become a web development battle cry and having a tableless website was worn as your badge of honor. To the web dev elite, having <br> tags in your HTML is a sin punishable by death (or at least severe laughing and poking).
Now we are moving in to the so-called ‘Web 2.0’ era. The time of shiny websites with page refreshes cut down to a select few actions. Animations and special effects compliment the content as it fades in and out of view. Libraries like YUI, Dojo and Prototype are making these things increasingly easy and well supported. But with all this, I feel we’re forgetting something. Where’d the presentation layer go?
When you’re animating a rollover or fading some colors do you stop and thing what you’re doing? You’re putting the colors, dimensions and effects into your JavaScript! The presentation layer that you’ve worked so hard to externalize is leaking into your JavaScript code. This is a slippery slope that we have to prevent now. The presentation layer should remain in the CSS, markup in the HTML and logic in the JavaScript. If you want to change the colors or sizes the elements are morphed into, you should be making those changes in CSS.
This brings me to my solution. I present to you an extension to the YUI animation library that will perform your cool animations from the styles defined in your CSS. I call it ClassAnim.
How it works
- ClassAnim starts by reading the styles from the base element.
- Then it quickly applies the new CSS class to it, reads the new styles and removes the class. This happens quicker than the user can notice.
- Now it compares the styles from both versions, extracts the differences that can be animated, and invokes the animation.
With ClassAnim, when you want to make a color or dimensional change you don’t have to go searching through your JavaScript, you make the change straight in the CSS — the way it was meant to be.
See the demo
(Please note: This API is still beta)
Link Rollovers (HoverHijax)
Here’s a simple implementation for rollovers. You’ll notice that all the links on my site have a fading hover effect on them (try mousing over one). This uses a simplified version of ClassAnim that I call HoverHijax. It only animates colors and does it on mouseover and mouseout. My original prototype would actually honor the :hover pseudo class, but good ‘ol Internet Explorer wasn’t allowing me to get to those styles through JavaScript. The current implementation adds a ‘hover’ class to all links when they are being moused over.
See the demo
(Please note: This API is still beta)
The best thing with HoverHijax is that it follows the Progressive Enhancement (or Hijax) strategy and can easily work with or without JavaScript as long as you use the ‘hover’ class along with a ‘:hover’ pseudo class. The only difference is that without JavaScript it wont have the cool fade effect.
a:hover, a.hover {

   color: #000;

}
Where to Download
You can download these new ‘experimental’ APIs from my subversion repository.